Kubernetes is slowly becoming the de-facto standard for managing workloads on large cluster of machines, especially in the cloud environment. Architectural principles of Kubernetes (like containerized workloads, efficient resource allocation and utilization, extensibility, remote deployment and management of applications) can be very well applied to Edge Computing. This is exactly what the KubeEdge project has implemented. According to the documentation, "KubeEdge is an open source system for extending native containerized application orchestration capabilities to hosts at Edge.It is built upon kubernetes and provides fundamental infrastructure support for network, app. deployment and metadata synchronization between cloud and edge".
KubeEdge works in tandem with the Kubernetes control plane to manage the edge nodes. The edge nodes are devices like Raspberry Pi (or any Linux based SBC) which run the containerized applications. KubeEdge has two main components: Cloudcore and Edgecore. Cloudcore is the collection of 3 components (CloudHub, EdgeController and DeviceController) which interact with the Kubernetes API server and manages the communication with edge nodes. Edgecore runs on the edge devices which syncs the device changes with cloud and manages the containerized applications.
To quicly start experimenting with KubeEdge, we need not actually procure hardware like Raspberry Pi. The Edgecore can be executed on modest virtual machines so that we can verify our applications/architecture/workflow before deploying them to physical devices. The following diagram shows the resources we are going to create for our test KubeEdge cluster:
 Architecture Diagram of KubeEdge Cluster Deployment
Infrastructure Components
This GitHub repository contains the Terraform code to create this architecture. There are Terraform modules are written:
- VPC The module creates a VPC with 2 subnetworks, one for the cloud components and the other for the edge components
- Config Bucket This is the bucket stores the configuration files and tokens which the Kubernetes and KubeEdge clusters need to share among each other. When the Kubernetes control plane is initialzed, the kubeconfig file is uploaded to the config bucket. The kubeconfig file is later downloaded by Cloudcore during KubeEdge cluster deployment, and also to the end user's machine from where Terraform is applied. Cloudcore also uploads the keadm token to the config bucket, which is later downloaded by the Edgecore during installation.
- Kubernetes Cluster The Kubernetes cluster consists of 1 control plane node and n worker nodes. The cluster is created using kubeadm. These shell scripts install the cluster:
controlplane_init.sh: This will install Docker, kubectl, and kubeadm on the Kubernetes control plane node. It also initializes the control plane, install the Flannel pod network add on, and copies the generated kube config file to the config bucket
worker_init.sh: This will install Docker, kubectl and kubeadm on all the Kubernetes worker nodes. It also waits for the control plane to be available and joins the worker nodes to the cluster
- KubeEdge Cluster The KubeEdge cluster consists of 1 Cloudcore node which connects with the Kubernetes control plane. And n Edgecore nodes which represent edge devices. These shell scripts install the KubeEdge cluster:
cloudcore_init.sh: This will download the kube config file from the config bucket, install keadm utility and initialize the KubeEdge cloudcore. It also uploads the keadm join token to the config bucket
edgecore_init.sh: This will install Docker and keadm on all the edge nodes. It waits for the KubeEdge cloudcore to be available and joins the edge nodes to the cluster
provider "google" {
  credentials = file(var.credentials_file_location)
  project     = var.project_name
  region      = var.region
  zone        = var.zone
}

module "vpc" {
  source   = "./modules/vpc"
  vpc_name = var.vpc_name
  region   = var.region
}

module "config_bucket" {
  source       = "./modules/config_bucket"
  project_name = var.project_name
}

module "kubernetes" {
  source                = "./modules/kubernetes"
  vpc_name              = var.vpc_name
  subnetwork_name       = module.vpc.subnetwork_1_name
  zone                  = var.zone
  k8s_worker_node_count = var.k8s_worker_node_count
  config_bucket         = module.config_bucket.config_bucket_url
}

module "kubeedge" {
  source                = "./modules/kubeedge"
  config_bucket         = module.config_bucket.config_bucket_url
  vpc_name              = var.vpc_name
  zone                  = var.zone
  subnetwork_name       = module.vpc.subnetwork_2_name
  edge_node_count       = var.edge_node_count
}
Steps to Deploy the Cluster
- Create an account on Google Cloud Platform and create a project. This project is where all the infrastructure resources will be created.
Go to the service account key page in the Cloud Console and create a new service account with Project -> Owner role. Download the credentials file in JSON format.
Enable the GCP APIs: Storage, Compute Engine, VPC, IAM. If you're enabling the APIs for the first time, wait ~20-30 minutes before applying Terraform. The GCP API activation does not take immediate effect.
Clone this GitHub repository
cd in to the repository
Edit the file named “terraform.tfvars” with the following required parameters:
- region: the GCP region where all the resources will be created
- vpc_name: the name for the virtual private cloud network
- zone: the GCP zone where all the resources will be created. The zone must be in the same region as declared in step 6.1
- project_name: name of the GCP project which was created in step 1
- k8s_worker_node_count: number of worker nodes to be created for the Kubernetes cluster
- edge_node_count: number of edge nodes to be created for the KubeEdge cluster
- credentials_file_location: path to the JSON credentials file downloaded in Step 2
region                    = "us-west2"
vpc_name                  = "kubeedge-infra"
zone                      = "us-west2-a"
project_name              = "deploy-kubeedge-gcp"
k8s_worker_node_count     = 2
edge_node_count           = 4
credentials_file_location = "~/Downloads/deploy-kubeedge-gcp-19242787b5a4.json"
Install Terraform by following the steps mentioned in the official documentation
Run terraform init to initialize the and import the Terraform modules into the working directory
Run terraform plan to view all the infrastructure components Terraform will create in Google Cloud
Run terraform apply --auto-approve which will start creating the cluster infrastructure on GCP.
The kubeconfig file for the Kubernetes cluster is downloaded to modules/kubernetes/config. Run the following command to setup KUBECONFIG
export KUBECONFIG=`pwd`/modules/kubernetes/config
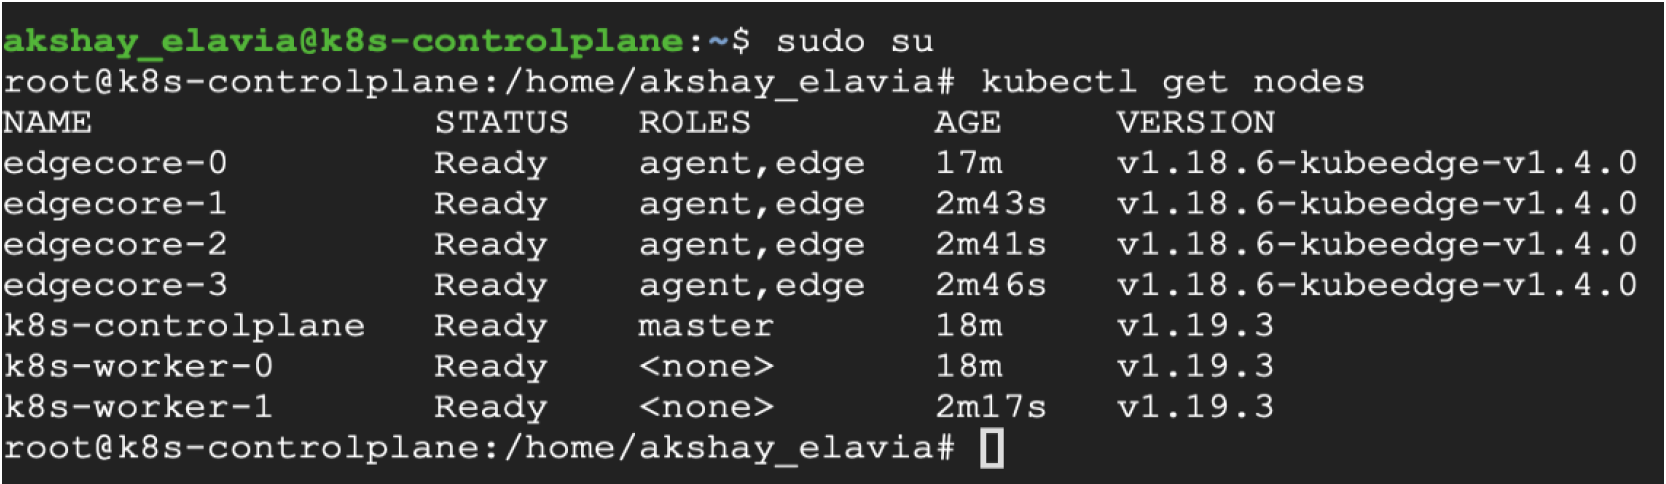
Run kubectl get nodes to see the worker nodes and edge nodes of the cluster
If the nodes are not visible, it’s possible that the cluster setup is still in progress. To view the logs for cluster setup, ssh into the node via the GCP Virtual Machines UI, and tail the /var/log/user-data.log file on any node.
If you want to add or remove any nodes from the existing cluster, simply edit the “terraform.tfvars” file with desired values for variables k8s_worker_node_count or/and edge_node_count and run terraform apply --auto-approve
Login to the GCP Console to view the created resources